

 English
 Français
 русский
 عربى
عربى Español
Content
- 1 Why Marble Wall Stickers Have Become Such a Popular Choice
- 2 Types of Marble Wall Stickers and What Each Is Best For
- 3 How to Choose the Right Marble Wall Sticker for Your Space
- 4 Surface Preparation: The Step Most People Skip
- 5 Step-by-Step Application Guide for Marble Contact Paper
- 6 Using Marble Wall Stickers in Specific Rooms: What Works and What Doesn't
- 7 How to Keep Marble Wall Stickers Looking Good Long-Term
- 8 How to Remove Marble Wall Stickers Without Damaging Your Walls
Why Marble Wall Stickers Have Become Such a Popular Choice
Marble wall stickers — also sold as marble contact paper, marble peel-and-stick wallpaper, and marble vinyl wall decals — have moved well beyond novelty status. They've become a legitimate decorating tool used by renters, homeowners, and interior designers alike because they deliver something that was previously expensive and permanent: the visual weight and elegance of real marble at a fraction of the cost and with none of the commitment. A roll of quality marble contact paper can transform a bathroom wall, a kitchen backsplash, or a furniture surface in an afternoon and be removed without damaging the substrate underneath.
The appeal is also practical. Real marble costs anywhere from $50 to $200+ per square foot installed, requires professional fitting, and is essentially permanent once in place. A marble wall sticker or self-adhesive marble film costs a few dollars per square foot, can be applied by anyone with patience and a squeegee, and comes off cleanly when you move or change your mind. For rental properties in particular, marble peel-and-stick wall covering offers a way to dramatically upgrade a space without violating no-modification lease clauses.
That said, the quality range across marble wall sticker products is enormous. Cheap options look flat and unconvincing up close, peel at the edges within weeks, and leave adhesive residue when removed. Premium marble vinyl films have convincing depth, realistic vein patterns, durable surfaces, and clean-removal adhesive that genuinely doesn't damage paint. Knowing how to tell the difference before you buy is the most important skill for getting results you'll be happy with.
Types of Marble Wall Stickers and What Each Is Best For
The term "marble wall sticker" covers several distinct product formats, and each performs differently depending on where it's applied and how long it needs to last. Understanding the differences prevents the common mistake of buying the wrong type for the job.
Self-Adhesive Marble Contact Paper
This is the most versatile format and the most widely used. It comes in rolls, typically 17–24 inches wide and sold by the foot or in preset lengths. The backing peels away to reveal a pressure-sensitive adhesive that bonds to most smooth surfaces — walls, cabinets, countertops, shelving, and furniture. Quality contact paper uses a repositionable adhesive for the first few minutes after application, giving you time to adjust alignment before it sets fully. Marble contact paper is the go-to choice for covering large wall areas, kitchen backsplashes, and furniture surfaces where seamless coverage is needed.
Marble Peel-and-Stick Wallpaper Panels
These are pre-cut panels — usually 24 × 48 inches or similar — designed to be applied in a grid pattern like tiles or in offset rows like traditional wallpaper. The panel format makes pattern alignment more manageable for beginners since you're working with defined sections rather than a continuous roll. Many peel-and-stick marble wallpaper products in this format include a printed repeat pattern designed to align at panel edges, creating a seamless look when installed correctly. These are particularly popular for accent walls and bathroom feature walls.
Marble Vinyl Wall Decals
Decals are pre-cut shapes or designs rather than continuous coverage material. A marble wall decal might be a large geometric shape, a botanical outline filled with marble texture, or a set of abstract panels arranged as a design composition. Decals apply as single units and are best used as decorative focal points rather than for covering entire walls. They're the easiest type to apply and remove without error, making them ideal for anyone new to peel-and-stick decorating.
Marble Tile Stickers
These are adhesive vinyl squares specifically sized to go over existing ceramic or porcelain tiles, typically in 4×4 or 6×6 inch formats. They're not wall stickers in the traditional sense but are widely sold and searched under the marble wall sticker category. Marble tile stickers let you update dated bathroom or kitchen tile without demolition — a huge appeal for renters. They adhere directly to the tile surface and, with proper application, can look surprisingly convincing for years before grout line edges show wear.
How to Choose the Right Marble Wall Sticker for Your Space
With the number of marble wall sticker products available, narrowing down the right choice requires thinking about a few specific factors rather than just picking the most attractive image in a product listing.
Marble Pattern Style
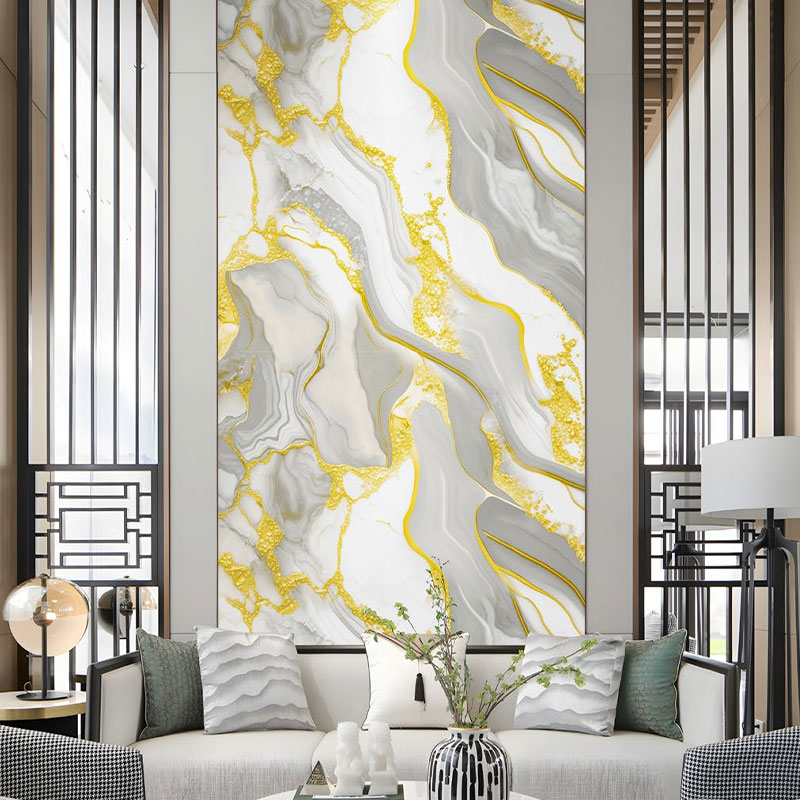
Real marble has enormous variety — from Calacatta with its dramatic, widely-spaced grey-gold veining on a bright white ground, to Nero Marquina with its stark white veins on deep black, to Emperador with warm brown tones. The pattern style you choose should complement the existing color palette of the room. White Carrara-style marble patterns (fine grey veins on off-white) are the most universally flattering and work in almost any space. Black marble stickers make a strong statement but can visually shrink a room if used excessively. Green and terracotta marble variants are trending for maximalist and biophilic interiors.
Material Thickness and Texture
Thicker vinyl (measured in mils; 4 mil and above is the threshold for quality) is more dimensionally stable, tears less during application, and conforms better to slightly uneven surfaces. Budget marble stickers are often as thin as 2 mil, which makes them difficult to apply without wrinkles and prone to tearing at corners. For wall applications, 5–7 mil self-adhesive vinyl is the practical sweet spot. For furniture or countertops, 7–10 mil provides better durability against daily contact and cleaning.
Surface Finish: Gloss, Matte, or Satin
Glossy marble wall stickers reflect light strongly and can look more convincing in low-light rooms or as a backsplash behind kitchen appliances where the sheen reads as natural polished stone. However, gloss finishes show fingerprints readily and may look too reflective in bright, naturally lit rooms. Matte marble stickers have a honed-stone quality that suits contemporary and Scandinavian interiors and are far more forgiving with fingerprints and surface imperfections. Satin finishes split the difference and are the most versatile choice for general wall use.
Adhesive Type and Removability
This is perhaps the most practically important specification and is often the least clearly communicated in product listings. Look for products that explicitly state "clean removal" or "damage-free removal" and ideally specify that the adhesive is designed for painted drywall. Permanent adhesive marble stickers bond aggressively and will peel paint on removal — fine for commercial installations but destructive in rental properties or anywhere you expect to change the look eventually. Repositionable or low-tack adhesives allow adjustment during application but may not hold as securely in humid environments like bathrooms.
Surface Preparation: The Step Most People Skip
The single biggest cause of marble wall stickers peeling, bubbling, or failing to adhere evenly is inadequate surface preparation. The adhesive on even the highest-quality marble peel-and-stick film cannot bond properly to a dirty, greasy, or unstable surface. Spending ten minutes preparing the wall correctly will determine whether your installation lasts months or years.
- Clean the surface thoroughly: Wipe the wall with a damp cloth to remove dust, then follow with a clean cloth dampened with isopropyl alcohol (rubbing alcohol). This removes grease, cleaning product residue, and any silicone from previous adhesive products. Let the surface dry completely — at least 30 minutes — before applying anything.
- Check paint condition: If the wall paint is peeling, flaking, or chalky, the marble sticker will pull the paint off with it on removal — or worse, won't adhere at all. Sand any flaking areas lightly, prime, and repaint before applying the marble contact paper. Fresh paint needs at least 30 days to cure fully before self-adhesive products are applied to it.
- Assess surface texture: Marble wall stickers bond best to smooth or lightly textured surfaces. Heavy orange-peel texture, sand-textured paint, or rough plaster significantly reduces contact area and causes premature edge lifting. On textured walls, a skim coat of wall compound sanded smooth gives a far better substrate for adhesive film.
- Temperature matters: Apply marble stickers in a room that is between 60°F and 80°F (15–27°C). Cold adhesive is stiff and won't bond well; high heat makes repositionable adhesives set too quickly for alignment adjustments. Avoid applying in direct sunlight.
Step-by-Step Application Guide for Marble Contact Paper
Applying marble contact paper to a large wall area requires more patience and technique than simply peeling and sticking. The following method minimizes bubbles, misalignment, and wasted material:
- Measure and cut with extra allowance: Cut each panel or strip about 2 inches longer than needed at both the top and bottom. This gives you material to grip during application and trim precisely once the panel is positioned. Cutting exactly to size before application leaves no margin for error.
- Mark a level starting line: Use a spirit level or laser level to draw a faint pencil line across the wall where your first strip will begin. Marble patterns have strong directional veining — even a slightly off-level start will be very visible once several panels are up.
- Peel and apply in sections: Rather than peeling the entire backing off at once, peel back just 4–6 inches from the top, fold the backing under itself, and position the top edge carefully against your level line. Press firmly with a squeegee or credit card, then slowly peel more backing while continuing to squeegee downward in overlapping strokes, always working air outward toward the sides.
- Work bubbles toward edges immediately: Small bubbles can usually be pushed out toward the nearest edge with firm squeegee pressure while the adhesive is still fresh. Bubbles that are trapped for more than a few minutes become more difficult to move. For stubborn small bubbles on repositionable film, a fine pin prick followed by gentle pressure will release the air without leaving a visible mark.
- Overlap and pattern-match seams: For a seamless result, overlap adjacent strips by ½ inch, aligning the marble pattern as closely as possible. Use a straightedge and sharp craft knife to cut through both layers simultaneously at the overlap — this creates a perfect butt seam with no gap and no double thickness. Remove the waste from both layers and press the seam edges firmly.
- Trim edges last: Once the panel is fully applied and smoothed, use a fresh craft knife blade against a metal ruler to trim flush at ceiling, floor, and corner lines. A dull blade will tear rather than cut cleanly, so change blades frequently during trimming.
Using Marble Wall Stickers in Specific Rooms: What Works and What Doesn't
Not every marble wall sticker product is suitable for every environment, and matching the right product spec to the room conditions prevents premature failure.
| Room / Surface | Suitability | Product Spec to Look For | Key Consideration |
| Living Room Accent Wall | Excellent | 5–7 mil, matte or satin, removable adhesive | Pattern scale — large rooms suit bolder veining |
| Kitchen Backsplash | Good | Waterproof, 7–10 mil, heat-resistant film | Keep away from direct flame; not a permanent fix |
| Bathroom Walls | Good with caveats | Moisture-resistant, mold-inhibiting adhesive | Seal all edges with silicone; avoid steam zones |
| Furniture Surfaces | Excellent | Thick vinyl, scrubbable surface finish | Test adhesive on a hidden area first |
| Over Existing Tiles | Good | Tile sticker format, waterproof, grout-line sized | Grout lines must be clean and level with tile face |
| Staircase Risers | Good | Durable vinyl, strong adhesive (permanent is fine here) | Pre-cut to riser size; corners need careful trimming |
How to Keep Marble Wall Stickers Looking Good Long-Term
A well-applied marble wall sticker or marble contact paper installation can look sharp for several years with minimal maintenance — but a few common mistakes accelerate deterioration quickly. These are the habits that separate installations that last from those that start peeling within months.
Cleaning Without Damaging the Surface
Most quality marble vinyl wall stickers can be wiped clean with a damp cloth and mild soap. Avoid abrasive cleaners, scouring pads, or solvent-based cleaners — these strip the surface coating and dull the finish. For kitchen backsplash applications where grease is a factor, a spray of diluted white vinegar solution wiped with a microfibre cloth is effective and safe for the vinyl surface. Never use steam cleaners on marble contact paper as the heat and moisture will soften the adhesive and cause lifting.
Addressing Edge Lifting Before It Spreads
Edge lifting almost always starts at corners, seams, or cuts rather than in the middle of a panel. When you notice a corner starting to lift, address it immediately — a lifted edge that isn't fixed becomes a larger problem within days as the adhesive behind it dries out and loses its tack. Press the edge back down firmly after warming it slightly with a hair dryer on low heat to reactivate the adhesive. If it doesn't re-adhere, apply a small amount of vinyl adhesive or a repositionable glue stick behind the lifted section and press firmly for 60 seconds.
Managing Humidity in Bathrooms and Kitchens
High humidity is the primary enemy of marble wall stickers in wet rooms. Condensation that forms behind the sticker at seams and edges will eventually break down even a good adhesive. To extend life in these environments, use a silicone sealant bead along all edges and seams immediately after application — the same way you'd seal a tile edge. Run bathroom exhaust fans during and after showering to minimize the time moisture is in contact with sticker surfaces. In kitchens, ensure there is adequate ventilation above the hob to prevent steam consistently hitting the backsplash area.
How to Remove Marble Wall Stickers Without Damaging Your Walls
One of the primary selling points of marble peel-and-stick wall stickers is that they can be removed — but the technique matters enormously. Rushed removal is the main cause of paint damage and adhesive residue that's difficult to clean up.
- Use heat to soften the adhesive first: A hair dryer on medium heat held 2–3 inches from the surface for 20–30 seconds per section softens the adhesive and makes the vinyl much more flexible and easier to peel without tearing. Work in small sections — heat one area, peel it back slowly, then reheat the next section.
- Peel at a low angle: Pull the sticker back on itself at a shallow angle — close to 180° back over itself — rather than pulling it directly away from the wall at 90°. The low-angle peel puts far less stress on the paint beneath and significantly reduces the risk of pulling paint off with the sticker.
- Remove adhesive residue with the right solvent: If any adhesive remains on the wall after peeling, a small amount of isopropyl alcohol, Goo Gone, or WD-40 applied with a soft cloth will dissolve it without harming most painted surfaces. Test in an inconspicuous area first and wipe away any residue with a clean damp cloth after treatment.
- Don't rush cold removals: Trying to remove marble contact paper in a cold room is far more likely to result in torn stickers and paint damage. If the room is cold, warm it to at least 65°F (18°C) before starting, or rely more heavily on the hair dryer to compensate.


