

 English
 Français
 русский
 عربى
عربى Español
Content
- 1 Why Marble Wall Stickers Are Worth Considering
- 2 Types of Marble Wall Stickers and What Sets Them Apart
- 3 Choosing the Right Marble Pattern and Finish for Your Space
- 4 Surface Preparation — The Step Most People Skip
- 5 How to Apply Marble Wall Stickers Without Bubbles or Wrinkles
- 6 Room-by-Room Ideas for Using Marble Wall Decals
- 7 How Long Do Marble Wall Stickers Last?
- 8 How to Remove Marble Wall Stickers Without Damaging the Wall
- 9 Marble Wall Sticker vs. Other Marble Look Options — How They Compare
Why Marble Wall Stickers Are Worth Considering
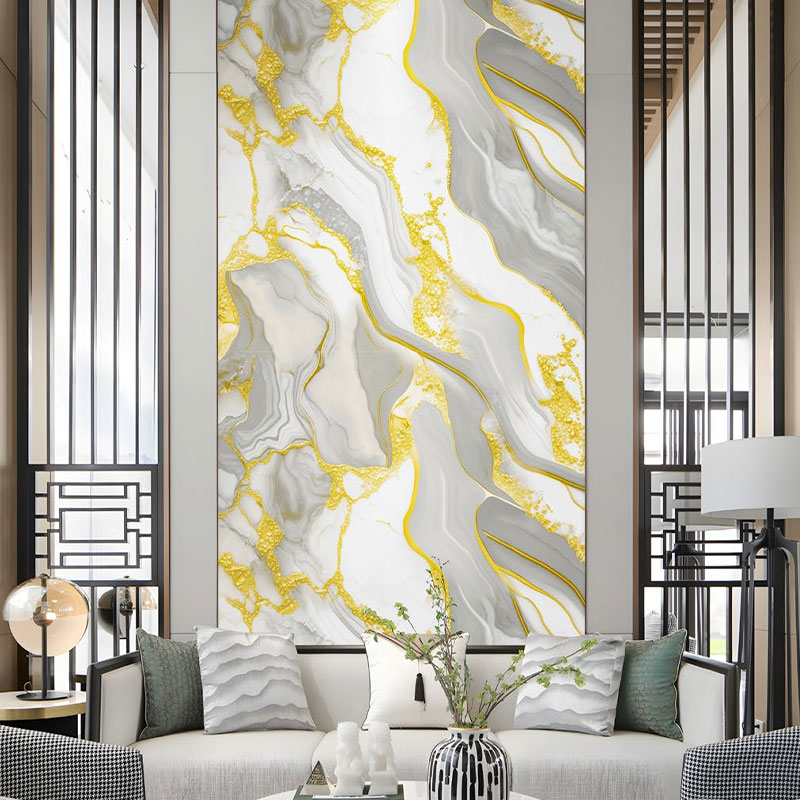
Real marble walls are expensive, permanent, and require professional installation — marble wall stickers give you the same visual richness at a fraction of the cost, with the added benefit of being completely reversible. Whether you want to create a dramatic accent wall in a living room, add a sophisticated backdrop to a home office, or dress up a bathroom without a full renovation, marble effect wall stickers deliver a convincing result that most guests would struggle to distinguish from the real thing at a glance. The best modern marble wall decals use high-resolution printing on textured vinyl that replicates the natural veining, depth, and slight sheen variation of real marble with impressive accuracy.
The practical appeal goes beyond aesthetics. Marble pattern wall stickers are removable — making them an ideal solution for renters who can't paint or tile walls, homeowners who want a temporary look while deciding on permanent materials, or anyone who simply wants flexibility to refresh their interior without committing to a costly renovation. They also install in hours rather than days, require no specialized tools beyond a squeegee and a level, and can be repositioned during application before the adhesive fully bonds. For budget-conscious decorating, they represent one of the highest visual-impact-per-dollar improvements you can make to a room.
Types of Marble Wall Stickers and What Sets Them Apart
Not all marble wall stickers are the same material, and the differences in construction significantly affect how they look, how long they last, and how easily they apply and remove. Understanding the main types helps you match the product to your specific use case.
Self-Adhesive Vinyl Marble Stickers
Self-adhesive vinyl is the most common substrate for marble wall stickers sold for home décor use. The sticker consists of a printed vinyl face layer, an adhesive layer, and a release liner that peels away during application. Quality matters considerably here — thin, low-grade vinyl stretches and distorts during application, making large panels difficult to align properly. Premium marble vinyl wall stickers use a thicker gauge film (80 to 120 microns) with a calendered or cast construction that is dimensionally stable, conforms to slight surface texture, and resists shrinkage or lifting at the edges over time. Look for products specifically described as "air-release" or "bubble-free" vinyl, which has a micro-channel pattern in the adhesive that allows trapped air to be squeegeed out easily during installation — an enormous practical advantage on large panels.
Peel-and-Stick Marble Wallpaper Panels
Marble peel-and-stick wallpaper panels are a step up in scale and effect from standard stickers. These come in rolls or large-format sheets — typically 24 inches wide and sold by the foot or meter — and are designed to be applied like traditional wallpaper in vertical or horizontal strips. The construction is similar to self-adhesive vinyl but with a fabric or non-woven backing that gives the material more body and drape, making alignment across multiple strips more manageable. High-quality peel-and-stick marble wallpaper uses pattern-matched printing so that adjacent strips continue the veining seamlessly, creating a unified marble surface that reads as a single slab rather than a tiled repetition. This type is the best choice when covering an entire wall rather than a smaller accent area.
Marble Contact Paper
Marble contact paper is the most affordable and widely available form of marble wall sticker, sold in rolls typically 24 to 48 inches wide by several feet or meters in length. It is thinner and less rigid than premium vinyl stickers, which makes it slightly more prone to tearing during installation and more susceptible to edge lifting over time — particularly in humid environments like bathrooms. For low-moisture rooms and flat, smooth surfaces, marble contact paper delivers a very acceptable result at minimal cost. It is particularly popular for covering furniture, shelving, and countertops in addition to walls, where its flexibility is an advantage rather than a limitation. The adhesive on contact paper tends to be less sophisticated than on premium vinyl, so careful surface preparation is essential for longevity.
3D Marble Foam Wall Stickers
A distinct category from flat-printed marble stickers, 3D marble foam wall stickers use a printed foam tile construction — typically in 12-inch square tile formats — that adds genuine dimensional texture to the wall surface. The foam backing gives the tiles slight relief depth, and some versions include subtle surface embossing that mimics the slight variation in a honed stone surface. These are popular for creating feature wall panels, particularly in living rooms and bedrooms, where the added texture gives a result that reads as more architectural than a flat printed sticker. They are thicker and heavier than standard vinyl options, and their self-adhesive backing is typically strong enough to hold without additional adhesive on most smooth surfaces.
Choosing the Right Marble Pattern and Finish for Your Space
The marble pattern and finish you choose sets the entire tone of the room it goes into. Real marble comes in dozens of varieties, and the best marble wall stickers replicate the specific character of recognizable marble types rather than a generic "marble look."
| Marble Style | Base Color | Veining Character | Best Room Use |
| Carrara White | White / Off-white | Fine grey veining, soft and subtle | Bathroom, kitchen, bedroom |
| Calacatta Gold | Bright white | Bold grey/gold veining, dramatic | Living room, feature wall, bathroom |
| Nero Marquina | Deep black | White veining, high contrast | Accent wall, bathroom, office |
| Emperador Brown | Warm brown / walnut | Cream and tan veining | Living room, dining area |
| Green Forest Marble | Deep forest green | White and gold veining | Statement wall, entryway, powder room |
| Rose Gold Marble | Blush pink / cream | Rose gold and white veining | Bedroom, dressing room, nursery |
In addition to the pattern, finish matters considerably. A gloss finish marble wall sticker reflects light and amplifies the sense of depth in the veining, creating a more luxurious feel — but it also shows fingerprints, dust, and light reflections from windows or fixtures that can reveal the flatness of the surface and make the printed nature of the sticker more apparent at certain angles. A matte or satin finish is more forgiving in high-traffic areas, reads more naturally in spaces with complex or uneven lighting, and is generally easier to keep looking clean. Satin is the most popular finish for bedroom and living room marble wall decals because it balances visual richness with practical wearability.
Surface Preparation — The Step Most People Skip
The single most common reason marble wall stickers fail — lifting at the edges, developing bubbles, or failing to adhere at all — is inadequate surface preparation before application. The sticker's adhesive is only as good as the surface it bonds to, and even the best-quality marble vinyl wall sticker will underperform on an improperly prepared wall.
- Clean the surface thoroughly: Walls accumulate cooking grease, dust, and airborne oils over time — none of which are visible to the eye but all of which compromise adhesive bond. Wipe the wall down with a solution of mild dish soap and warm water, then follow with a clean damp cloth to remove soap residue. For bathroom walls, a solution of white vinegar and water cuts through mineral deposits and soap scum more effectively. Allow the wall to dry completely — at least 2 hours, ideally overnight — before applying any sticker.
- Check for paint condition: Marble wall stickers adhere well to most flat, eggshell, and satin paint finishes in good condition. They do not bond reliably to chalky, flaking, or freshly painted walls. New paint needs to cure for at least 4 weeks before applying self-adhesive vinyl — paint that appears dry to the touch is not fully cured and off-gasses solvents that can interfere with adhesive bonding and cause the sticker to lift over time.
- Fill and sand imperfections: Marble wall stickers conform to surface texture to some degree, but significant cracks, holes, or rough patches will telegraph through the sticker and be visible in the finished result. Fill any holes with spackling compound, sand smooth, and repaint the repaired areas before applying the sticker.
- Use isopropyl alcohol for a final clean: After washing and drying, wipe the application area with isopropyl alcohol (70% concentration) on a clean lint-free cloth. This removes any remaining oil or residue and slightly roughens the paint surface at a microscopic level for better adhesive contact. Allow to evaporate completely before beginning application — this takes only 2 to 3 minutes.
How to Apply Marble Wall Stickers Without Bubbles or Wrinkles
Applying a large marble wall sticker cleanly requires a methodical approach and the right tools. Rushing this step is the fastest route to a result that looks worse than expected and is difficult to fix without removing the sticker entirely.
Tools You'll Need
- A plastic squeegee or credit card — for pressing out air bubbles and smoothing the sticker from center to edges
- A spirit level or laser level — to ensure horizontal alignment on large panels
- Low-tack painter's tape — for temporarily positioning the sticker before final application
- A heat gun or hair dryer — for warming stubborn areas or reactivating the adhesive if repositioning is needed
- A sharp craft knife or scissors — for trimming excess material at edges, corners, or around outlets
- A second person — genuinely helpful for panels wider than 24 inches
The Wet Method vs. Dry Method
For large marble wall stickers applied to smooth walls, the wet application method significantly reduces the risk of bubbles and allows repositioning after the liner is removed — a major advantage when working with large panels alone. Mix a solution of water with a few drops of dish soap in a spray bottle, spray the wall lightly, peel the liner from the sticker, and position the sticker onto the wet wall. The soapy water temporarily prevents the adhesive from bonding, allowing you to slide the sticker into perfect position. Once aligned, squeegee firmly from the center outward to push the water out from under the sticker, then leave it to cure for 24 to 48 hours. Not all vinyl adhesives are compatible with wet application — check the product instructions before using this method, as some adhesives lose effectiveness when wetted.
The dry method is simpler and appropriate for smaller stickers — up to about 18 inches on the shorter dimension. Peel back 2 to 3 inches of the liner from one edge, align that edge carefully, press it down, then slowly peel the rest of the liner away while pressing and smoothing the sticker against the wall with your other hand or a squeegee, working section by section. Never peel the entire liner off before application — the sticker immediately becomes unmanageable and will fold against itself or bond to the wrong area.
Fixing Bubbles During and After Application
Small bubbles that remain after squeegee application in air-release vinyl will typically disappear on their own within 24 to 48 hours as the trapped air diffuses through the micro-channels in the adhesive. For bubbles in standard vinyl, use a fine pin to pierce the bubble at a 45-degree angle, then press the vinyl flat with your fingertip or squeegee. The pin hole is invisible in the marble pattern at normal viewing distance. Large bubbles or wrinkles that form during application should be lifted and reapplied immediately — use a heat gun on low setting to warm the adhesive gently, which allows the vinyl to be peeled back and repositioned without tearing.
Room-by-Room Ideas for Using Marble Wall Decals
Marble wall stickers are versatile enough to work in almost every room of the house, and the best applications use the sticker strategically rather than covering every available wall.
Bedroom
The wall behind the bed head — the headboard wall — is the most impactful single wall in a bedroom for a marble sticker treatment. A floor-to-ceiling panel of white Carrara or Calacatta marble behind the bed immediately elevates the room to a hotel suite aesthetic without any other changes. If ceiling-height coverage feels too bold, a panel that extends 12 to 18 inches beyond the bed width on each side and reaches only to the top of the headboard creates a framed, intentional look. Pair with gold or brass fixtures and bedside lamps to complement the veining in a Calacatta or rose gold marble sticker.
Bathroom
Bathrooms are a natural fit for marble wall stickers — it's where the material has the strongest design association — but they also present the most challenging conditions for adhesive performance. High humidity, temperature fluctuations, and water splash require a waterproof vinyl sticker specifically rated for wet or high-humidity environments. Apply the sticker to the upper portion of bathroom walls where direct water contact is minimal, and avoid applying directly above a shower or bath surround unless the product is specifically rated for immersed or splash-zone use. A marble sticker on the vanity wall behind a mirror creates a bold focal point that photographs beautifully and dramatically changes the feel of the room.
Living Room and Dining Area
In living spaces, a marble pattern wall sticker works best as a single statement wall rather than applied throughout the room. The wall behind a sofa, a fireplace surround wall, or the wall facing the main seating area are all strong candidates. Darker marble varieties — Nero Marquina black marble or Emperador brown marble — work particularly well in living and dining rooms where you want warmth and drama rather than the lighter, cleaner feeling of white marble. Balancing a dark marble accent wall with light furniture and pale flooring prevents the space from feeling heavy.
Home Office and Study
The wall visible behind you in video calls has become prime real estate for home office decoration, and a marble wall sticker creates an instantly polished, professional backdrop that elevates how your workspace reads on screen. A single panel or half-wall treatment directly behind the desk chair is sufficient — you don't need to cover the entire room to achieve the effect. Green marble or dark grey marble variants work well in home offices where a more sophisticated, less residential feel is desired.
How Long Do Marble Wall Stickers Last?
The lifespan of a marble wall sticker depends on the quality of the vinyl, the quality of the surface preparation, and the environmental conditions of the room. Here is a realistic breakdown of expected longevity by product type and condition:
- Premium cast or calendered vinyl in a dry room: 5 to 7 years before UV fading, adhesive degradation, or edge lifting becomes noticeable. Print quality from premium suppliers using UV-resistant inks holds color for most of this period without significant fading in normal indoor light conditions.
- Standard marble contact paper in a dry room: 2 to 4 years before edge lifting and print fading become visible, particularly near windows where UV exposure is higher. Refreshing the edges with a heat gun and squeegee annually can extend this timeline.
- Any sticker in a high-humidity bathroom: 1 to 3 years depending on ventilation quality. Bathrooms with inadequate ventilation that allow steam to remain on wall surfaces will compromise adhesive bond significantly faster than well-ventilated bathrooms. Running the exhaust fan during and after showering makes a measurable difference.
- 3D foam marble tile panels: 3 to 5 years in normal indoor conditions. The foam construction is less susceptible to lifting at the edges than thin vinyl but more prone to compression damage if impacted.
How to Remove Marble Wall Stickers Without Damaging the Wall
One of the main selling points of marble wall stickers is removability — but improper removal can damage paint and leave adhesive residue that is frustrating to clean up. The right technique makes removal clean and damage-free in most cases.
- Heat before peeling: Use a hair dryer or heat gun on a low to medium setting to warm a section of the sticker — work in 12-inch sections rather than trying to heat the whole panel at once. Warmed adhesive releases from the wall significantly more easily and with less paint damage than cold adhesive. Hold the heat source 3 to 4 inches from the surface and keep it moving to avoid overheating the vinyl or paint.
- Peel at a low angle: Pull the sticker back at a 15 to 30-degree angle — nearly parallel to the wall surface — rather than pulling straight out at 90 degrees. Low-angle peeling puts the stress on the adhesive rather than the paint and dramatically reduces the risk of pulling paint off with the sticker.
- Remove adhesive residue: If adhesive remains on the wall after the sticker is removed, apply a small amount of cooking oil, baby oil, or commercial adhesive remover to the residue, allow it to soak for 2 to 3 minutes, then rub with a soft cloth in circular motions. Isopropyl alcohol can follow to clean any oily residue. Never use abrasive scrubbers on painted walls.
- Touch up paint if needed: If small patches of paint lift with the sticker — most likely to occur on walls painted with low-quality flat paint — touch up with matching paint after adhesive residue is fully cleaned. Having a small amount of the original wall paint saved is useful for exactly this situation.
Marble Wall Sticker vs. Other Marble Look Options — How They Compare
Marble wall stickers exist alongside several other ways to achieve a marble look on walls, and understanding where they sit in the broader landscape helps confirm whether they're the right choice for a given situation or whether an alternative would serve better.
| Option | Approx. Cost (per sq ft) | Installation Difficulty | Removable? | Durability |
| Marble Wall Sticker | $1 – $5 | Easy (DIY) | Yes | 2 – 7 years |
| Peel-and-Stick Marble Wallpaper | $3 – $8 | Moderate (DIY) | Yes | 3 – 7 years |
| Traditional Marble Wallpaper (paste) | $5 – $15 | Moderate to Hard | With effort | 7 – 15 years |
| Marble Effect Paint / Faux Finish | $5 – $20 (materials + labor) | Hard (skill required) | No | 5 – 10 years |
| Porcelain Marble Look Tile | $15 – $40+ | Professional required | No | 20 – 30 years |
| Real Marble Slab / Tile | $40 – $150+ | Professional required | No | Decades with care |
The cost-per-square-foot advantage of marble wall stickers is clear, and for renters or anyone who wants a non-permanent solution, they are genuinely in a category of their own. Where they fall short compared to tile or traditional wallpaper is longevity and the tactile experience — up close, a flat printed surface doesn't have the weight and coolness of real stone. For most interior applications where the goal is visual impact from a normal viewing distance, that trade-off is entirely reasonable. For applications where touch and durability are priorities — a high-traffic hallway, a kitchen splash zone, or a bathroom that will see daily heavy use — investing in a more durable solution is worth the additional cost.


